Saturday, November 18, 2006


Wedding Cake Practice Run #1
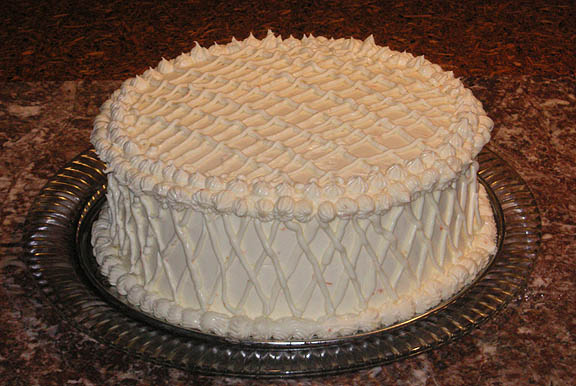
So, attached is the photo of my first attempt at a wedding cake tier. This is an 8" cake tier with three layers of orange carrot cake with orange cream cheese frosting. I just ordered the other pans that I'll need for making a four tiered cake with a larger 14" tier as the base and 10", 8", and 6" tiers on top. The decoration on this cake is just for experimentation. I found out by doing this one that one should pipe from the base to the top instead of from the top to the base. Also, the lattice work (if you can call it that) was an after thought, so I did that design after I did the frosting poops around the base and the top. I would do it the other way around next time. I might actually decorate each tier differently 'cause I would love to figure out the wicker basket technique, but don't want to do it for all four tiers. I may also just be very plain and decorate with orange or gardenia blossoms instead. I've been researching how to make wedding cake for a few weeks and wasn't sure my cake and frosting combo was going to work as my frosting doesn't use a lot of powdered sugar but rather relies on the cream cheese for stiffness. It worked! The things I never knew about making professional (or somewhat professional cakes) are that the cake should all be made in 3" tall pans and then leveled off and cut into 1" layers. The other thing I never knew was about the crumb layer of frosting. Its bloody brilliant, there is a first layer of frosting that goes on to keep the crumbs in and then the cake is refrigerated to set before the final layer goes on. Thats how those wedding cake tiers get so tall and round, its not the cake, but rather the frosting that does that. KEWL!
Enjoy,
Seth

Wednesday, November 15, 2006


Well, I know that I am not a patient man. Creating dough that has to rise for at least 12 hours in a warm 70 degree place is not going to be a staple in this house! I made two batches of the bread dough from the New York Times article I read in the paper the other morning. With both batches, I used straight whole wheat flour, something I might change in the future, If I ever have a block of time to do this again. The first batch I prepared just as the recipe told me to, but I couldn't stand it any longer after 12 hours and so I made the bread. With the second batch, I added olive oil to the dough before its inital rise and let that dough rise for over 20 hours. The photo above is of the 20 hour loaf. Beautiful on the outside, lovely on the inside, but the taste was a bit bland, so I would mess around with different types of flours and additions if I were to make this again. Though, 20 hours is a long time to wait or plan for bread!!!
Gotta get on the road, but here is the recipe:

3 cups bread flour or whatever mix you want
couple of pinches of salt
1 teaspoon yeast

sift together in a bowl
add: 1 5/8ths cups warm water
drizzle or two of olive oil

Mix with a fork until combined. Dough will be sticky. I ended up combining with my hands at the end to get the dough to come together.
Cover with plastic wrap and let stand for 18-20 hours in a 70 degree draft free place. I put mine by the wood stove, but in the middle of the night I knew it was nowhere near 70 there.

After rising (dough will have small bubbles on top) put on floured work surface and fold dough into itself one or two times. Let rest for 15 minutes covered loosely with plastic. Quickly shape dough into ball Sprinkle flour or cornmeal over tea towel and place dough there seam side down..sprinkle with cornmeal or flour, cover with another towel and let rise 2 hours or until at least doubled in bulk.

1/2 hour before rise is over preheat oven to 450 and place in oven a 6-8 quart covered pot (pyrex, cast iron, etc.) when rise is over, carefully remove hot pot lid, slide your hand under the lower tea towel and flip dough into pot with the seam side up. It will look like hell, but wait. Cover pot and bake for 30 minutes. Uncoverand bake for 15-20 minutes more until bread thumps hollow.

Yields 1 1/2 lb loaf

Let me know your results

Enjoy,
Seth

Monday, November 13, 2006

I read this article in the New York Times about making no-knead bread and how it will revolutionize the bread industry because normal people like me can create bakery style crusty boules with little or no muss. Of course the dough has to rise over a period of 12 to 18 hours at a temp of around 70 degrees! My thermostat is set to 60 degrees, so maybe I'll wrap a pair of sweat socks around the bowl! Actually, for the energy conscious ,just set the bowls at the base of the wood stove. I'll update you tomorrow on progress.

Enjoy,
Seth